Setting up Selenium is not a very big deal if done carefully. It is very important that you don’t miss any important step in the Set Up.
I would note down all the required set up below to make it very easy to set up Web Driver in your windows machine.
Step 1. Download Selenium 2 Web Driver from here.
Step 1. Download Selenium 2 Web Driver from here.
Click on the highlighted link shown in the below figure.

You will get the folder in your download path and keep it there and unzip it so that you can use it in later steps. The files in the folder should look something like this :

Step 2 : Create a New Java Project in Eclipse.
( I prefer Eclipse which is a great tool that works with Selenium and Java )
If you are not very familiar with Eclipse, then you can get a good overview of Eclipse here.
Note:
I am pointing all the links in this blog because this all has helped me understanding Java, Eclipse and TestNG very easily.
And I am hoping that this can help you understand that as well. Let me know how you go with it ! !
Step 3 : Add External Files ( Referenced Libraries ) in to the Eclipse.
a. Right Click the project and go to Properties.
b. Go to Java Build Path | Library tab | Add External JARs…
c. Now add all the jar files mentioned in Step 1 above where you downloaded Selenium folder earlier.
d. Check if they are appearing in the Eclipse as below.

Step 4 : Set up TestNG to be used with Eclipse.
TestNG is a testing framework designed to simply various testing needs starting from Unit Testing, Functional Testing or Integration Testing.
There are other alternatives available to use instead of TestNG which is for example JUnit. I decided to use TestNG.
Highlights of TestNG are as below -
- TestNG is supported by all major JAVA IDEs Eclipse, IntelliJ IDEA, and NetBeans.
- TestNG comes with custom tasks for Apache Ant and supported by Apache Maven build system. – Cool for me as I’ll be running Selenium Tests over nightly.
- Hudson (Continuous Integration Server) has built in support for TestNG. – This is very helpful if your Devs are working in Continuous Integration environment.
For more details and documentation, you can go to the TestNG website.
So, now as I have decided to use TestNG, here are the steps for how to set the new Testing Framework to work with your Selenium Web Driver project.
a. In Eclipse, go to Help | Help | Install New Software

b. Now, enter http://beust.com/eclipse in the field as displayed in the image below.
Wait about 5 seconds and TestNG will be appeared in the window. Check the box next to TestNG and Click on Next button.

c. Click on Finish and the Restart the Eclipse.
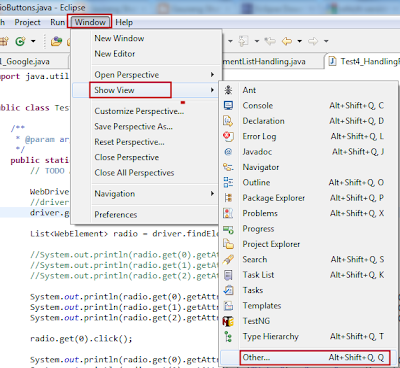
d. Open Eclipse. Go to the menu Window | Show View | Other

Step 5 : Verify that TestNG has been installed to Eclipse properly
Check that TestNG has been appearing in the Eclipse. One of the ways to check that out is as below:

That is it !! You are done with everything you need to set up. You can start working on Selenium WebDriver now.
All the best !!

3 comments:
Preconfigured: https://plus.google.com/u/0/106512319961417658924/posts/coNVk5AU2fd
Thanks a lot for this post. I was searching for this setup.
Awesome help guide.
Post a Comment